Aside from being Good Friday, it's also Earth Day!
In recent years I have really tried to be more environmentally conscious by recycling, not being so wasteful, etc. Even more recently I've really seen the beauty in upcycling/repurposing. I have some projects in mind to tackle in the coming weeks to do just that...and I am SUPER excited about them!
I really think it's important for us to realize how very precious and fragile our world is. We need to do our part to protect and preserve it for generations to come! It amazes me how wasteful we are. At the rate we're going now, in 20 years we'll be living in a landfill! Kind of scary to think about! Take some time today to brainstorm ways you can be less wasteful. Take the time to recycle (really...it's not hard!), take 5 minutes off of your shower time, turn that light out when you leave a room, carpool to work (with gas prices soaring, this is actually a very wise decision), reuse items when you can....the list goes on. Every step you take to change your lifestyle makes a difference!
My "adopted niece" (since we don't have any brother's or sisters, I have claimed my best friend's kids as my niece and nephew) enlisted my help on her school project for Earth Day. Her assignment was to make a piece of art using "clean trash". Her idea was to make some flowers. With some newspaper, straws, Tootsie Roll tubes, and cardboard, this is what we came up with:
How super cute and fun is this? I think it's a beautiful piece of "recycled art".
Happy Earth Day everyone!
Friday, April 22, 2011
Easter Tweets
Can you believe Easter is right around the corner? I sure can't. This year is flying by already!
I wanted to make a special treat for Bryson's daycare class for their Easter party yesterday, so I came up with the brilliantly titled "Chicks on Sticks" to make.
You'll need:
Then, you stick your marshmallows onto your sticks.
Next, dip into the chocolate and cover the marshmallow.
Now you just add your chocolate sprinkles for the eyes and cut a small triangle for the mouth out of your orange gummies.
At this point, I was a little worried that they weren't going to turn out as cute as I had envisioned (which always happens to me) and I ALMOST gave up....but, I thought better of it and kept on.
After letting them dry for a few minutes, I went back and drizzled a little chocolate on top for some "hair". (I also think this makes them look kind of "Elvis-y"...which is super cool.)
Afterwards, I (with the help of my husband) wrapped them up and tied them with some cute Easter ribbon. I had a little bucket I got at the Dollar Tree for, you guessed it, $1 to put them in.
I think all in all, they turned out to be pretty cute! Bryson loved them, so I'm sure all the other 2 year olds did too. Tweet tweet!
I wanted to make a special treat for Bryson's daycare class for their Easter party yesterday, so I came up with the brilliantly titled "Chicks on Sticks" to make.
You'll need:
- Marshmallows
- Yellow melting chocolate
- Sucker sticks
- Chocolate sprinkles
- Orange gummy candy
Then, you stick your marshmallows onto your sticks.
Next, dip into the chocolate and cover the marshmallow.
Now you just add your chocolate sprinkles for the eyes and cut a small triangle for the mouth out of your orange gummies.
At this point, I was a little worried that they weren't going to turn out as cute as I had envisioned (which always happens to me) and I ALMOST gave up....but, I thought better of it and kept on.
After letting them dry for a few minutes, I went back and drizzled a little chocolate on top for some "hair". (I also think this makes them look kind of "Elvis-y"...which is super cool.)
Afterwards, I (with the help of my husband) wrapped them up and tied them with some cute Easter ribbon. I had a little bucket I got at the Dollar Tree for, you guessed it, $1 to put them in.
I think all in all, they turned out to be pretty cute! Bryson loved them, so I'm sure all the other 2 year olds did too. Tweet tweet!
Monday, April 18, 2011
Miscellaneous Monday--Easy Recipe
Happy Monday Everyone!
Maybe some of you cringed when you read that...but trust me, it's worth a try. I personally am a fan of tuna, however my husband is not. Even so, he will chow down on this recipe!
This is one of the easiest, cheapest recipes I've ever made, AND it makes a TON which I love even more because we can have the leftovers for lunch the next day. (2 meals for the price of 1!!) The recipe calls for tuna (duh), Stove Top Stuffing Mix, mayo, relish, cheddar cheese and carrot. (most of which you may already have in your fridge or pantry!) The best part is, for those who aren't huge tuna fans, the stuffing mix totally overpowers the tuna taste so you don't even realize that you're eating tuna.
Click HERE to see the complete recipe.
I've made them with and without the carrots, and have also changed it up and used corn bread stuffing mix rather than the chicken flavored that is suggested. I think no matter what you do to this recipe it will still be good! I've been brainstorming different things to add in to make it even tastier. You have GOT to give it a try!
Enjoy your Monday!
As a busy working mom on a budget, 2 criteria that I need for mealtime in our house are 1-It needs to be QUICK and 2-It needs to be CHEAP. (Of course healthy is important too.) One recipe that I've used a couple of times and LOVED is Kraft's recipe for Tuna Cakes.
Maybe some of you cringed when you read that...but trust me, it's worth a try. I personally am a fan of tuna, however my husband is not. Even so, he will chow down on this recipe!
This is one of the easiest, cheapest recipes I've ever made, AND it makes a TON which I love even more because we can have the leftovers for lunch the next day. (2 meals for the price of 1!!) The recipe calls for tuna (duh), Stove Top Stuffing Mix, mayo, relish, cheddar cheese and carrot. (most of which you may already have in your fridge or pantry!) The best part is, for those who aren't huge tuna fans, the stuffing mix totally overpowers the tuna taste so you don't even realize that you're eating tuna.
Click HERE to see the complete recipe.
I've made them with and without the carrots, and have also changed it up and used corn bread stuffing mix rather than the chicken flavored that is suggested. I think no matter what you do to this recipe it will still be good! I've been brainstorming different things to add in to make it even tastier. You have GOT to give it a try!
Enjoy your Monday!
Friday, April 15, 2011
Stamp Pendant Tutorial
And now...what you've all been waiting for.....
I'm finally posting my stamp pendant tutorial! You will have to pardon the terrible pictures....I'm less than thrilled with my camera's performance lately. I will hopefully be investing in a new one in the coming months!
Ok, let's get started. You'll need the following supplies:
Second, I like to place my tile on top of my stamp to figure out what part of the stamp I want to "capture" in the pendant.
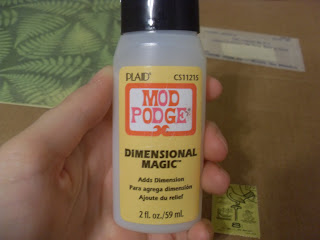
Once you find where you want your tile to be, remove the tile and get your Mod Podge Dimensional Magic handy. (ignore all of that stuff in the background of the pic)
Place one drop of Dimensional Magic in the center of your stamp. Now, let me just say that you DO NOT need a lot of Dimensional Magic. Just one drop will be plenty! Trust me!
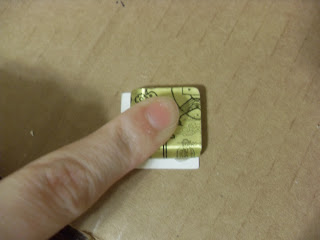
After adding your Dimensional Magic, press your tile down on top of the stamp. Note: It's important to press it down pretty hard to ensure not only that the Dimensional Magic spreads evenly, but that you also eliminate any air bubbles that may be hiding under there.
You may have a little excess glue leak out from the sides--this is ok, just wipe away and keep moving. We will deal with that later on.
Now, you wait for it to dry. I usually leave mine overnight to ensure that it's fully dried, however I think 30 minutes to an hour would be plenty.
After it dries, it should look like this:
Now go back and trim the excess stamp around the glass tile.
You could cut your stamp to size prior to gluing the tile on, however I am TERRIBLE at cutting things, so I prefer to wait until the tile is glued on so I can be sure my stamp is cut the right shape. However you're comfortable with is fine.
Now, since we're working with stamps and not regular paper, it's important to put a "backing" of sorts to not only protect the stamp, but to also cover up the adhesive that all stamps have on the back.
To do this, I cut out a square of cardstock (again, since I'm terrible at cutting, so I use my Cricut), and glue it on the back of the pendant with the Dimensional Magic...the same way we glued the stamp.
Allow about 15 minutes for drying, then trim the excess off. (again, if you are a skilled scissor-er, then you can go ahead and cut your paper to size before hand. If my Cricut cut smaller squares, I would have cut them smaller)
This is what the back should look like afterwards:
Now, seal in the paper with a couple of coats of Dimensional Magic. Once again, you don't need a lot, just a drop will do ya.
I use a paint brush to spread it evenly over the back. I usually do about 2-3 coats, allowing a few minutes for drying in between coats.
Remember when I said we would deal with any excess Dimensional Magic that leaked onto the sides? Here's where we do that....but first let me warn you that I am the queen of using random items I have on hand to get the tasks done. There is probably a safer, more effective way of doing this next step....but this is what works for me. Do what works for you.
I use a razor blade and gently scrap each side of my pendant to remove all the excess glue that has dried on the sides. I'm a messy crafter, so sometimes I even end up with glue spots on the front of the pendant, which easily come off with the razor. And no, this will not scratch the glass.
A crafting knife would also work or anything with a sharp edge for scraping. This is just what I've found to work best for me.
Next, pull out your heavy duty glue. I use E-6000.
Place a small dot (you don't need a lot!) where you want your necklace bail to be.
Press your bail on.
You will probably have some excess glue so I use a small piece of rolled up paper to just scrape off the excess while it's still wet.
Let your glue dry for a good hour or so and VOILA!!! Your pendant is complete!
WHEW! That was exhausting! I hope y'all enjoy making your pendants!
I'm finally posting my stamp pendant tutorial! You will have to pardon the terrible pictures....I'm less than thrilled with my camera's performance lately. I will hopefully be investing in a new one in the coming months!
Ok, let's get started. You'll need the following supplies:
- Glass tile
- Stamp
- Mod Podge Dimensional Magic
- Paint brush
- Scissors
- Necklace bail
- Heavy duty glue
Second, I like to place my tile on top of my stamp to figure out what part of the stamp I want to "capture" in the pendant.
Once you find where you want your tile to be, remove the tile and get your Mod Podge Dimensional Magic handy. (ignore all of that stuff in the background of the pic)
Place one drop of Dimensional Magic in the center of your stamp. Now, let me just say that you DO NOT need a lot of Dimensional Magic. Just one drop will be plenty! Trust me!
After adding your Dimensional Magic, press your tile down on top of the stamp. Note: It's important to press it down pretty hard to ensure not only that the Dimensional Magic spreads evenly, but that you also eliminate any air bubbles that may be hiding under there.
You may have a little excess glue leak out from the sides--this is ok, just wipe away and keep moving. We will deal with that later on.
Now, you wait for it to dry. I usually leave mine overnight to ensure that it's fully dried, however I think 30 minutes to an hour would be plenty.
After it dries, it should look like this:
Now go back and trim the excess stamp around the glass tile.
You could cut your stamp to size prior to gluing the tile on, however I am TERRIBLE at cutting things, so I prefer to wait until the tile is glued on so I can be sure my stamp is cut the right shape. However you're comfortable with is fine.
Now, since we're working with stamps and not regular paper, it's important to put a "backing" of sorts to not only protect the stamp, but to also cover up the adhesive that all stamps have on the back.
To do this, I cut out a square of cardstock (again, since I'm terrible at cutting, so I use my Cricut), and glue it on the back of the pendant with the Dimensional Magic...the same way we glued the stamp.
Allow about 15 minutes for drying, then trim the excess off. (again, if you are a skilled scissor-er, then you can go ahead and cut your paper to size before hand. If my Cricut cut smaller squares, I would have cut them smaller)
This is what the back should look like afterwards:
Now, seal in the paper with a couple of coats of Dimensional Magic. Once again, you don't need a lot, just a drop will do ya.
I use a paint brush to spread it evenly over the back. I usually do about 2-3 coats, allowing a few minutes for drying in between coats.
Remember when I said we would deal with any excess Dimensional Magic that leaked onto the sides? Here's where we do that....but first let me warn you that I am the queen of using random items I have on hand to get the tasks done. There is probably a safer, more effective way of doing this next step....but this is what works for me. Do what works for you.
I use a razor blade and gently scrap each side of my pendant to remove all the excess glue that has dried on the sides. I'm a messy crafter, so sometimes I even end up with glue spots on the front of the pendant, which easily come off with the razor. And no, this will not scratch the glass.
A crafting knife would also work or anything with a sharp edge for scraping. This is just what I've found to work best for me.
Next, pull out your heavy duty glue. I use E-6000.
Place a small dot (you don't need a lot!) where you want your necklace bail to be.
Press your bail on.
You will probably have some excess glue so I use a small piece of rolled up paper to just scrape off the excess while it's still wet.
Let your glue dry for a good hour or so and VOILA!!! Your pendant is complete!
WHEW! That was exhausting! I hope y'all enjoy making your pendants!
Wednesday, April 13, 2011
Bath Time!
Back in August, we moved into our new house. I'm still slowly working on decorating...but I still have a long way to go. The upstairs has pretty much remained untouched for the most part, with the exception Bryson's play room that we painted a bright, fun green. I just can't make up my mind on what I want so I've just left everything alone until I can decide. I'll get there.....one day.
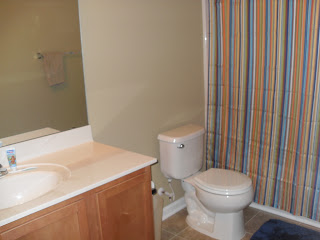
Anyways, one area that has been in major need of some "flare" is Bryson's bathroom. Sure, I got a cute shower curtain and some rugs but look at all that bare wall space! (There's a lot more that isn't shown in the picture)
Sooo I decided to make a little bit of wall art to hang up. Bryson's favorite Bible story is Jonah and the Whale....and I figured a whale was a perfect theme for some bathroom art.
I had a canvas on hand, so I painted it in a fun, bright blue.
I drew my whale shape on some cute polka dot paper and used my Cricut machine to cut out the words "Bath Time". After using some good ole Mod Podge to adhere my whale and my letters to the canvas, my project was complete!
Now...I would take a picture of it hanging up in the bathroom buuuuuut I haven't hung it yet. I'll get to it......eventually.
Tuesday, April 12, 2011
Link Party
Today I'm "Getting my Craft on" over at "Today's Creative Blog" and linking up my stamp pendants here:
Head on over and check it out!
Monday, April 11, 2011
Miscellaneous Monday! (We made it!)
Well friends, you'll be happy to know I survived my big city trip to NYC. We arrived home Saturday afternoon and it was so nice to be back in SC. We left 40 something degree weather in NY on Saturday morning and stepped off the plane in SC to temps in the mid 80's. What a difference! Anywho, it's good to be home!
I wanted to take a few seconds today to talk about my pride and joy...my son Bryson, who I missed dearly while I was away. For those who don't know, I have the cutest, sweetest (well...sometimes), wildest 2 year old on the planet. He is a sure fire Mama's boy (which I love) and the absolute love of my life! There is just something special about the bond between a mother and her son. It is definitely a love like no other!
While every day with a toddler is not always sweet......the tantrums, attitude, and defiance will drive you mad....I wouldn't trade my role as a Mommy for anything. He made my Monday this morning by hugging my leg and telling me I was "bootiful". (Go ahead, let your heart melt!!) Who couldn't love this little guy?
Ok, enough of my Mommy gushing. I could talk about my little guy all day long. In other news, the crafting jewelry fairy visited me while I was away! I have all kinds of stuff to make more pendants/necklaces/magnets/rings...etc! I'm so excited to get to work! Be checking my store Stamped With Approval in the coming days for all kinds of new stuff just in time for Mother's Day!
I'm also working on my tutorial for the stamp pendants that many of you have requested. Bear with me as I get this completed. My camera at home really stinks so making tutorials has proven to be a difficult task. I hope to have it completed this week! Stay tuned.
As always, thanks for checking in!!
Monday, April 4, 2011
First ever weekly edition of Miscellaneous Monday!!!!
Happy Monday Everyone! I've decided to start a weekly post entitled Miscellaneous Monday in which I will talk about various things...could be crafting, cooking, kids, or just life in general. Anything goes on Miscellaneous Mondays! (hence the miscellaneous part!)
This week my other half and I will be traveling (ALONE!--no toddler in tow) to the one and only NEW YORK CITY!
We leave bright and early on Wednesday morning and will come back Saturday afternoon. We are so excited to have a nice trip by ourselves! This will be my husband's first time visiting the Big Apple, but my second time. My mom and I made a trip last year in order to celebrate her 50th birthday, and we had a ball....so much so that I couldn't wait to go back and take my husband. Our 4 year wedding anniversary is in a couple weeks so what better way to celebrate than taking a trip to the big city?
On our list of things to do is seeing Spiderman on Broadway.
I am soooo excited! Last year I saw Mary Poppins and fell in love with it! One of the main reasons I wanted to go back to NYC was to see more shows on Broadway. Since Spiderman was one of the more "manly" options, this is what my husband wanted to see. I'm hoping to maybe sneak in another show such as Wicked or The Lion King while we're there. We shall see!
I honestly never thought I would like a big city like NYC. For a small town South Carolina girl like me, big cities scare the crap out of me. NYC is really easy to fall in love with though...the bright lights, the sites, the culture....everything that is so different from my little Southern world. But, while I love to visit NYC, I wouldn't trade my life here in SC for anything. This is my home and I love it!
Here are a few things I love about my home and the South:
I could go on and on about what I love about the South....but I'll save that for another time. What about you? What do you love about the South?
Come Wednesday I'll say goodbye to my sweet tea and grits, and our 80 degree "spring" weather, and say HELLO to the chilly, yet magical world that is NYC. I can't wait! (Oh...and keep your fingers crossed that we wont get lost!)
Talk to y'all soon!
This week my other half and I will be traveling (ALONE!--no toddler in tow) to the one and only NEW YORK CITY!
We leave bright and early on Wednesday morning and will come back Saturday afternoon. We are so excited to have a nice trip by ourselves! This will be my husband's first time visiting the Big Apple, but my second time. My mom and I made a trip last year in order to celebrate her 50th birthday, and we had a ball....so much so that I couldn't wait to go back and take my husband. Our 4 year wedding anniversary is in a couple weeks so what better way to celebrate than taking a trip to the big city?
On our list of things to do is seeing Spiderman on Broadway.
I am soooo excited! Last year I saw Mary Poppins and fell in love with it! One of the main reasons I wanted to go back to NYC was to see more shows on Broadway. Since Spiderman was one of the more "manly" options, this is what my husband wanted to see. I'm hoping to maybe sneak in another show such as Wicked or The Lion King while we're there. We shall see!
I honestly never thought I would like a big city like NYC. For a small town South Carolina girl like me, big cities scare the crap out of me. NYC is really easy to fall in love with though...the bright lights, the sites, the culture....everything that is so different from my little Southern world. But, while I love to visit NYC, I wouldn't trade my life here in SC for anything. This is my home and I love it!
Here are a few things I love about my home and the South:
This is our Capital and what we call "the city" here...and where my day job is located. |
The Congaree River and the beautiful Gervais St. Bridge These are grits--a STAPLE in the South...YUM! |
Sweet tea....and I mean SWEET! This does not mean iced tea with sweetener in it....this means tea with SUGAR in it and LOTS OF IT! |
Come Wednesday I'll say goodbye to my sweet tea and grits, and our 80 degree "spring" weather, and say HELLO to the chilly, yet magical world that is NYC. I can't wait! (Oh...and keep your fingers crossed that we wont get lost!)
Talk to y'all soon!
Subscribe to:
Posts (Atom)