Pages

Monday, May 23, 2011

Miscellaneous Monday!

Ok I know the blog updates have been few and far between lately....the truth is, there just isn't enough time in the day for the things I want to do.  I work every day from 8-5, get home around 6:00PM, somehow scrounge up dinner for my husband and little guy, spend a little QT with my son, and before I know it, it's bed time. Weekends are spent mostly doing church events as my husband and I are deeply involved in our church (he is our worship leader, and I am currently the "co-director" of our children's ministry). That leaves little time for crafting, home decor projects, or blogging.  **sigh**  I have so many ideas in my head of things I want to do, but just can't find the extra time to do them.
One thing I really want to do, that I've mentioned previously, is personalize our house more.  So for today's Miscellaneous Monday, I figured I would make a list entitled  "I Would Love to Have....(maybe one day)" of things that I would like to eventually have in our house.

1. I would love to have built in bookshelves with a little "reading nook" much like this:

**Picture courtesy of Apartmenttherapy.com**
2. I would love to have a cute wall display of family photos/decor:


**Photo courtesy of Furniturefashion.com**
 3. I would love to have beautiful hardwoods in our hallway, stairway, and dining area.
**Photo courtesy of karaflooringcompany.com**
4. I would love to create an awesome play space for my son

**Photo courtsey of Pottery Barn Kids**
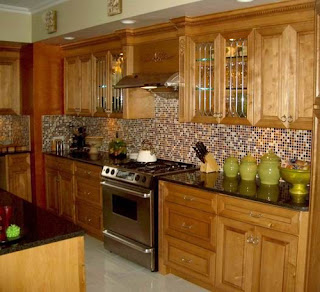
5.  I would love to put in a tile backsplash in the kitchen

**Photo courtesy of Homemakeoverdiva.com**

I could go on and on about all the things I'd love to do.....but for now I'll just keep adding to my mental "to-do" list and maybe one day we'll be able to make my to-do list a reality.  I think Journey said it best when they said "Don't Stop Believing!"


Saturday, May 14, 2011

Easy, cheap and GREEN project

If you live in the south like me, warm weather has officially arrived!  Something I love about warm weather is all the pretty flowers that you see everywhere!  After a bare winter, it's always nice to see all kinds of color and greenery blooming all around you. 
Although I love flowers and plants, I'm actually a known plant killer.  Every plant I've ever tried to keep at home dies.....it's really pretty sad.  We've spent loads of money in the past on different plants/bushes/flowers.....all of which died shortly thereafter.  Sigh.  Needless to say, since we moved into our new house, we haven't even attempted to do any kind of landscaping.  Maybe one day, but as of right now, we don't trust ourselves.
Because we are so terrible at keeping plants, but I still love them so much, I wanted to do something really cheap this year...you know, in case I screwed it up.  You can really end up spending so much money just getting pots and flowers and all that to put on your porch....and I just really didn't want to do that this year....when it is very likely I'll kill them.  Instead, I tried to come up with an inexpensive "greener" approach. 
I collected various sized aluminum cans, peeled the labels off and cleaned them up really good.  Then, I just picked out some springy spray paint colors and painted the cans.  We poked a few holes in the bottom of the cans for drainage and BAM---I had my very own cheap, repurposed planters.  I thought it would be fun for Bryson to plant some seeds in them so he could watch his flowers grow (you know....before we kill them).

They are not the most glamorous planters in the world, but they serve their purpose well and for the price...you can't beat them!  You could paint them all sorts of colors or designs or what have you.  The possibilities are endless! I have some large cans that I'm going to make into some hanging planters as soon as I get something to plant in them.  Hopefully I'll be able to finish that project up soon!

I don't know about you, but something about turning trash into treasure really excites me!

Monday, May 9, 2011

Miscellaneous Monday!

Happy belated Mother's Day to all the moms out there!  I hope your day was filled with lots of love and pampering.  I got to pamper myself on Friday afternoon by taking a couple hours off of work and enjoying a lovely pedicure/manicure....which is a rare treat for me!  It was wonderful!  Yesterday afternoon I enjoyed a lovely nap....also a rare treat....so I'd say Mother's Day was a success!
I figured, in the spirit of Mother's Day, I'd take a minute to talk about my mom. 
My dad died when I was 12, so my mom has had the difficult task of playing the role of mom and dad for me ever since.  I'm grateful to have her in my life and don't know where I'd be without her.  We may not always agree or see eye to eye, but we have a special bond that no one could ever replace.  I love her dearly and I am truly blessed to have her!  Thanks for always being there for me Mom!   

Monday, May 2, 2011

Miscellaneous Monday!

I realized that I missed last weeks Miscellaneous Monday about 3 days too late so you’ll have to forgive me for that. OOPS!
Today I wanted to bring a little humor into your Monday. For those of you who work every day, you all know that the day to day office routine can be quite boring. Especially for those of us who are stuck in a cubicle all day every day, with very little contact with the outside world. So in order to keep from losing your mind, you have to find little things that get you through the day. Maybe you bring your Ipod to work and listen to your favorite tunes all day. Maybe you sneak a few extra internet breaks into your work day. Maybe you try to see how many pieces of bubble gum you can fit in your mouth at one time. Or perhaps you create fake mustaches and act silly with your cubicle neighbor. I personally choose the latter. (Hey, to each his own…don’t judge!)


Our fascination with mustaches came from a visit to our favorite local Mexican restaurant during lunch one day. They actually sell stick on mustaches in the little candy machines! We are talking incredibly awesome stick on ‘staches….and of course we had to buy one. Ever since then, the ‘stache is a part of our every day life.

Ashley wearing the 'stache and me laughing, taken right after we first got this particular 'stache
I even took a ‘stache with me to NYC.

Sitting in the airport

In the office we like to play a little game called “find the ‘stache”, in which we hide the ‘stache in the other’s cubicle and wait until they find it…..at which point we go into a hysterical fit of giggles. Immature? Maybe. But hey, we gotta keep sane some how and staring at cubicle walls for 8 hours a day just aint gonna cut it.

Ashley and the 'stache

What do you do to keep your sanity at work?


Friday, April 22, 2011

Happy Earth Day!

Aside from being Good Friday, it's also Earth Day!

In recent years I have really tried to be more environmentally conscious by recycling, not being so wasteful, etc. Even more recently I've really seen the beauty in upcycling/repurposing.  I have some projects in mind to tackle in the coming weeks to do just that...and I am SUPER excited about them!

I really think it's important for us to realize how very precious and fragile our world is.  We need to do our part to protect and preserve it for generations to come!  It amazes me how wasteful we are.  At the rate we're going now, in 20 years we'll be living in a landfill!  Kind of scary to think about!  Take some time today to brainstorm ways you can be less wasteful.  Take the time to recycle (really...it's not hard!), take 5 minutes off of your shower time, turn that light out when you leave a room, carpool to work (with gas prices soaring, this is actually a very wise decision), reuse items when you can....the list goes on.  Every step you take to change your lifestyle makes a difference!

My "adopted niece" (since we don't have any brother's or sisters, I have claimed my best friend's kids as my niece and nephew) enlisted my help on her school project for Earth Day.  Her assignment was to make a piece of art using "clean trash".  Her idea was to make some flowers.  With some newspaper, straws, Tootsie Roll tubes, and cardboard, this is what we came up with:
How super cute and fun is this?  I think it's a beautiful piece of "recycled art".

Happy Earth Day everyone!

Easter Tweets

Can you believe Easter is right around the corner?  I sure can't.  This year is flying by already!

I wanted to make a special treat for Bryson's daycare class for their Easter party yesterday, so I came up with the brilliantly titled "Chicks on Sticks" to make.


You'll need:
  • Marshmallows
  • Yellow melting chocolate
  • Sucker sticks
  • Chocolate sprinkles
  • Orange gummy candy
First, you'll want to of course melt your chocolate. 

Then, you stick your marshmallows onto your sticks.

Next,  dip into the chocolate and cover the marshmallow.

Now you just add your chocolate sprinkles for the eyes and cut a small triangle for the mouth out of your orange gummies.
At this point, I was a little worried that they weren't going to turn out as cute as I had envisioned (which always happens to me) and I ALMOST gave up....but, I thought better of it and kept on.
After letting them dry for a few minutes, I went back and drizzled a little chocolate on top for some "hair". (I also think this makes them look kind of "Elvis-y"...which is super cool.)

Afterwards, I (with the help of my husband) wrapped them up and tied them with some cute Easter ribbon.  I had a little bucket I got at the Dollar Tree for, you guessed it, $1 to put them in.


I think all in all, they turned out to be pretty cute!  Bryson loved them, so I'm sure all the other 2 year olds did too. Tweet tweet!


Monday, April 18, 2011

Miscellaneous Monday--Easy Recipe

Happy Monday Everyone!
As a busy working mom on a budget, 2 criteria that I need for mealtime in our house are 1-It needs to be QUICK and 2-It needs to be CHEAP.  (Of course healthy is important too.)  One recipe that I've used a couple of times and LOVED is Kraft's recipe for Tuna Cakes.


Maybe some of you cringed when you read that...but trust me, it's worth a try.  I personally am a fan of tuna, however my husband is not.  Even so, he will chow down on this recipe!
This is one of the easiest, cheapest recipes I've ever made, AND it makes a TON which I love even more because we can have the leftovers for lunch the next day. (2 meals for the price of 1!!)  The recipe calls for tuna (duh), Stove Top Stuffing Mix, mayo, relish, cheddar cheese and carrot. (most of which you may already have in your fridge or pantry!)  The best part is, for those who aren't huge tuna fans, the stuffing mix totally overpowers the tuna taste so you don't even realize that you're eating tuna.
Click HERE to see the complete recipe. 
I've made them with and without the carrots, and have also changed it up and used corn bread stuffing mix rather than the chicken flavored that is suggested.  I think no matter what you do to this recipe it will still be good!  I've been brainstorming different things to add in to make it even tastier.  You have GOT to give it a try!
Enjoy your Monday!

Friday, April 15, 2011

Stamp Pendant Tutorial

And now...what you've all been waiting for.....

I'm finally posting my stamp pendant tutorial!  You will have to pardon the terrible pictures....I'm less than thrilled with my camera's performance lately.  I will hopefully be investing in a new one in the coming months!
Ok, let's get started.  You'll need the following supplies:
  • Glass tile
  • Stamp
  • Mod Podge Dimensional Magic
  • Paint brush
  • Scissors
  • Necklace bail
  • Heavy duty glue
First of course, choose your stamp. 
Second, I like to place my tile on top of my stamp to figure out what part of the stamp I want to "capture" in the pendant.
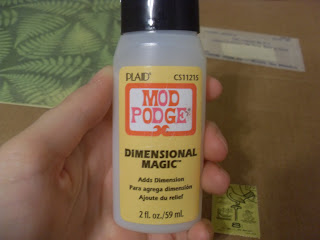
Once you find where you want your tile to be, remove the tile and get your Mod Podge Dimensional Magic handy. (ignore all of that stuff in the background of the pic)
Place one drop of Dimensional Magic in the center of your stamp.  Now, let me just say that you DO NOT need a lot of Dimensional Magic.  Just one drop will be plenty!  Trust me!
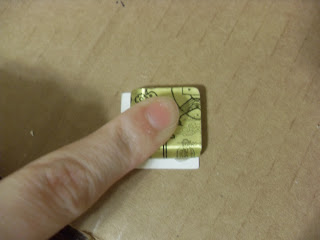
 After adding your Dimensional Magic, press your tile down on top of the stamp.  Note: It's important to press it down pretty hard to ensure not only that the Dimensional Magic spreads evenly, but that you also eliminate any air bubbles that may be hiding under there. 
You may have a little excess glue leak out from the sides--this is ok, just wipe away and keep moving.  We will deal with that later on.
Now, you wait for it to dry.  I usually leave mine overnight to ensure that it's fully dried, however I think 30 minutes to an hour would be plenty.
After it dries, it should look like this:
Now go back and trim the excess stamp around the glass tile.
You could cut your stamp to size prior to gluing the tile on, however I am TERRIBLE at cutting things, so I prefer to wait until the tile is glued on so I can be sure my stamp is cut the right shape.  However you're comfortable with is fine.
Now, since we're working with stamps and not regular paper, it's important to put a "backing" of sorts to not only protect the stamp, but to also cover up the adhesive that all stamps have on the back.
To do this, I cut out a square of cardstock (again, since I'm terrible at cutting, so I use my Cricut), and glue it on the back of the pendant with the Dimensional Magic...the same way we glued the stamp.

Allow about 15 minutes for drying, then trim the excess off.  (again, if you are a skilled scissor-er, then you can go ahead and cut your paper to size before hand.  If my Cricut cut smaller squares, I would have cut them smaller)
This is what the back should look like afterwards:
Now, seal in the paper with a couple of coats of Dimensional Magic.  Once again, you don't need a lot, just a drop will do ya. 
 I use a paint brush to spread it evenly over the back.  I usually do about 2-3 coats, allowing a few minutes for drying in between coats.
Remember when I said we would deal with any excess Dimensional Magic that leaked onto the sides?  Here's where we do that....but first let me warn you that I am the queen of using random items I have on hand to get the tasks done.  There is probably a safer, more effective way of doing this next step....but this is what works for me.  Do what works for you.
I use a razor blade and gently scrap each side of my pendant to remove all the excess glue that has dried on the sides.  I'm a messy crafter, so sometimes I even end up with glue spots on the front of the pendant, which easily come off with the razor.  And no, this will not scratch the glass. 

A crafting knife would also work or anything with a sharp edge for scraping.  This is just what I've found to work best for me.
Next, pull out your heavy duty glue.  I use E-6000.
 Place a small dot (you don't need a lot!) where you want your necklace bail to be.
Press your bail on.
 You will probably have some excess glue so I use a small piece of rolled up paper to just scrape off the excess while it's still wet.

 Let your glue dry for a good hour or so and VOILA!!!  Your pendant is complete!
WHEW! That was exhausting! I hope y'all enjoy making your pendants!