And now...what you've all been waiting for.....
I'm finally posting my stamp pendant tutorial! You will have to pardon the terrible pictures....I'm less than thrilled with my camera's performance lately. I will hopefully be investing in a new one in the coming months!
Ok, let's get started. You'll need the following supplies:
- Glass tile
- Stamp
- Mod Podge Dimensional Magic
- Paint brush
- Scissors
- Necklace bail
- Heavy duty glue
First of course, choose your stamp.
Second, I like to place my tile on top of my stamp to figure out what part of the stamp I want to "capture" in the pendant.
Once you find where you want your tile to be, remove the tile and get your Mod Podge Dimensional Magic handy. (ignore all of that stuff in the background of the pic)
Place one drop of Dimensional Magic in the center of your stamp. Now, let me just say that you DO NOT need a lot of Dimensional Magic. Just one drop will be plenty! Trust me!
After adding your Dimensional Magic, press your tile down on top of the stamp. Note: It's important to press it down pretty hard to ensure not only that the Dimensional Magic spreads evenly, but that you also eliminate any air bubbles that may be hiding under there.
You may have a little excess glue leak out from the sides--this is ok, just wipe away and keep moving. We will deal with that later on.
Now, you wait for it to dry. I usually leave mine overnight to ensure that it's fully dried, however I think 30 minutes to an hour would be plenty.
After it dries, it should look like this:
Now go back and trim the excess stamp around the glass tile.
You could cut your stamp to size prior to gluing the tile on, however I am TERRIBLE at cutting things, so I prefer to wait until the tile is glued on so I can be sure my stamp is cut the right shape. However you're comfortable with is fine.
Now, since we're working with stamps and not regular paper, it's important to put a "backing" of sorts to not only protect the stamp, but to also cover up the adhesive that all stamps have on the back.
To do this, I cut out a square of cardstock (again, since I'm terrible at cutting, so I use my Cricut), and glue it on the back of the pendant with the Dimensional Magic...the same way we glued the stamp.
Allow about 15 minutes for drying, then trim the excess off. (again, if you are a skilled scissor-er, then you can go ahead and cut your paper to size before hand. If my Cricut cut smaller squares, I would have cut them smaller)
This is what the back should look like afterwards:
Now, seal in the paper with a couple of coats of Dimensional Magic. Once again, you don't need a lot, just a drop will do ya.
I use a paint brush to spread it evenly over the back. I usually do about 2-3 coats, allowing a few minutes for drying in between coats.
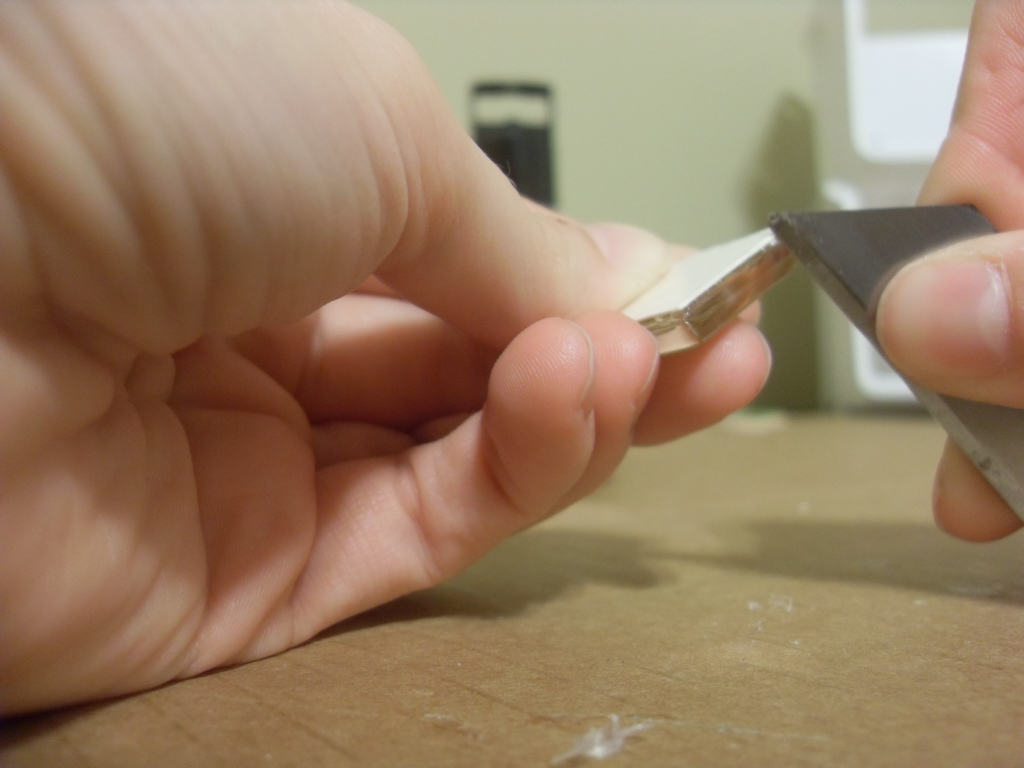
Remember when I said we would deal with any excess Dimensional Magic that leaked onto the sides? Here's where we do that....but first let me warn you that I am the queen of using random items I have on hand to get the tasks done. There is probably a safer, more effective way of doing this next step....but this is what works for me. Do what works for you.
I use a razor blade and gently scrap each side of my pendant to remove all the excess glue that has dried on the sides. I'm a messy crafter, so sometimes I even end up with glue spots on the front of the pendant, which easily come off with the razor. And no, this will not scratch the glass.
A crafting knife would also work or anything with a sharp edge for scraping. This is just what I've found to work best for me.
Next, pull out your heavy duty glue. I use E-6000.
Place a small dot (you don't need a lot!) where you want your necklace bail to be.
Press your bail on.
You will probably have some excess glue so I use a small piece of rolled up paper to just scrape off the excess while it's still wet.
Let your glue dry for a good hour or so and VOILA!!! Your pendant is complete!
WHEW! That was exhausting! I hope y'all enjoy making your pendants!


This is an excellent tutorial! I love the pendant!
ReplyDeleteThanks for posting this! I'm not too crafty but I think I'll give this a try...
ReplyDeleteThank you so much for posting this! I was hunting for a way to mount something I'm working on behind a glass pendant, and couldn't find anything even on the Plaid website. This is perfect for what I wanted to do - thanks for sharing the technique! You really ought to sell your pendants on Etsy - I bet they'd go like wildfire!
ReplyDeleteThanks Eileen! Im glad I could help! I actually have been selling them (not on etsy) and they've done pretty well! I hope yours turn out well!
ReplyDeleteHI EILEEN,
ReplyDeleteWHERE DO YOU GET THE GLASS TILE?
thank you for this tutorial. I love that you are preserving the stamps. What a talent you have.
ReplyDelete